

Author: [Anurag Panchal] | Category: Tally Prime Tutorial
Target Audience: Beginners, Accountants, Chartered Accountants
Software Version: Tally Prime (latest 2026 update)
Introduction
In my experience working with small businesses and accountants, most GST errors in Tally Prime happen because automatic GST is not set correctly. Many users think GST is automatic by default, but that is not true.
What Is Automatic GST Calculation in Tally Prime?
When you record a sales or purchase transaction in Tally Prime, GST amounts (CGST/SGST/IGST) are computed automatically based on the GST rates and HSN/SAC codes assigned to your items or ledgers. Tally fetches this information from your master setup and eliminates the need for manual calculation.
How to Set Automatic GST Calculation in Tally Prime
Step-by-Step: Enable GST in Tally Prime
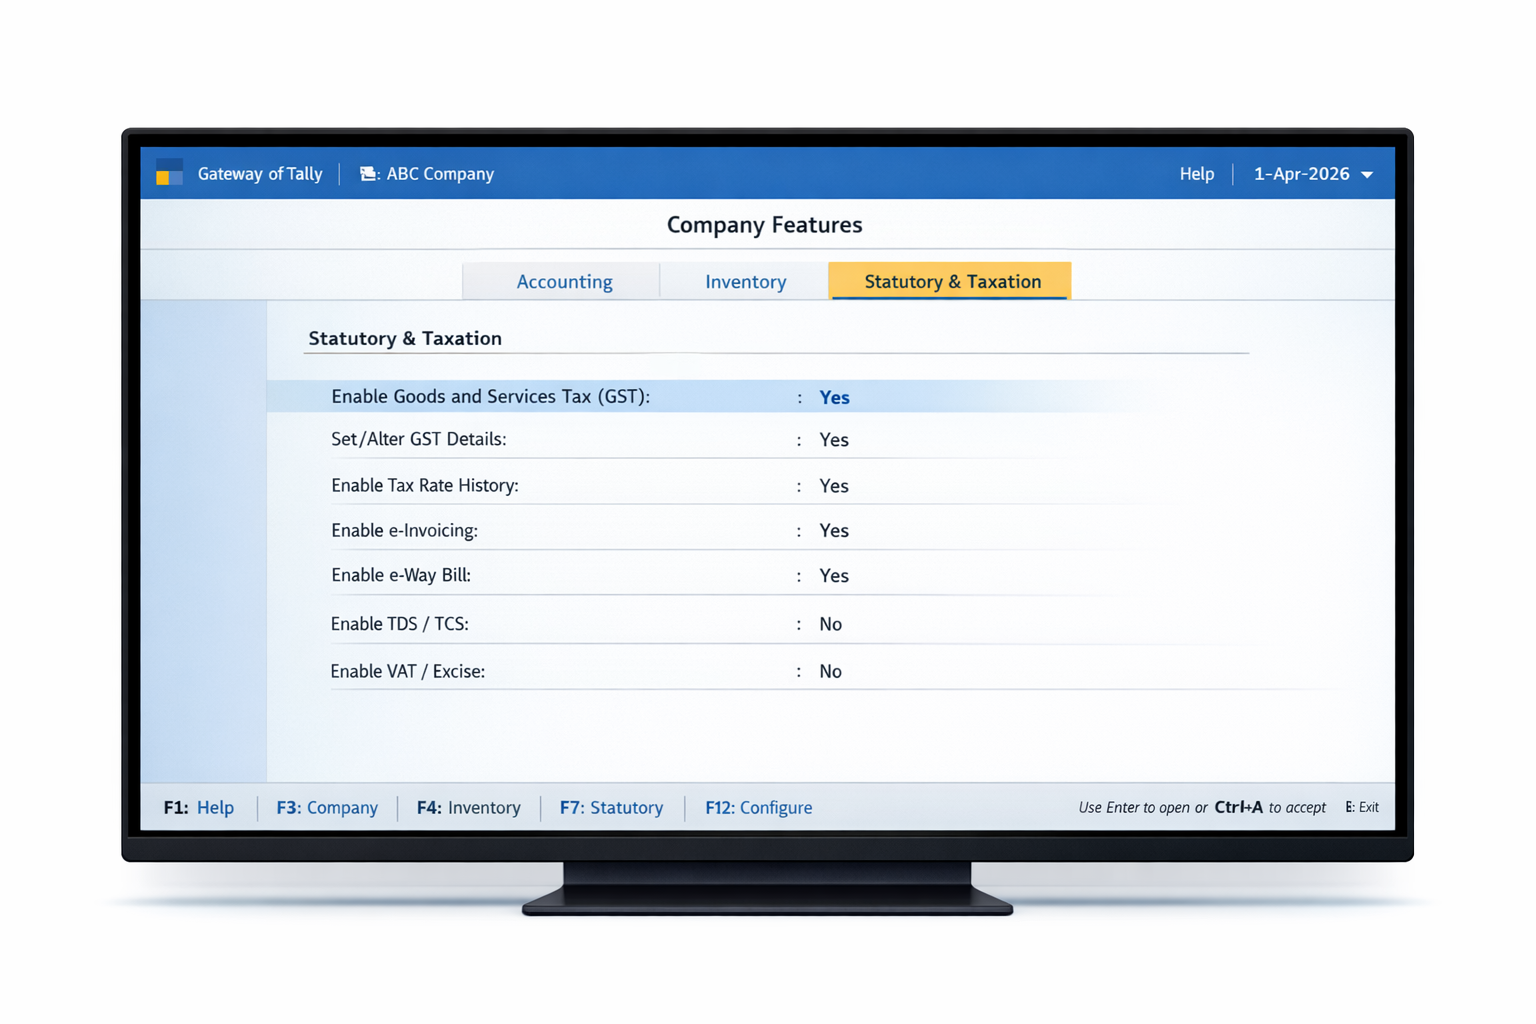
Step 1: Enable GST Feature
- Open your company in Tally Prime.
- Press F11 (Features) → Statutory & Taxation.
- Set Enable Goods and Services Tax (GST) to Yes.
- Save with Ctrl + A.
This activates the GST configuration screen where you can define tax details.
Before starting your GST setup, it is essential to familiarize yourself with the latest Tally Prime interface. If you need a comprehensive, step-by-step walkthrough, check out my professional guide on How to Enable and Auto-Calculate CGST & SGST in Tally Prime. This updated 2026 edition covers all the latest automated features and compliance settings to ensure your accounting remains error-free.
Many beginners forget to save this screen properly. If this setting is not enabled, GST will not calculate even if all ledgers and items are created correctly.
Step 2: Set Company-Level GST Details
In the GST setup screen:
- Specify GSTIN, State, and Registration Type (Regular/Composition).
- Choose Tax Applicability dates.
- Enable LUT/Bond details for export transactions if applicable.
Tip: For interstate sales, Tally will automatically switch to IGST; for intrastate, it will split between CGST and SGST.
When entering company details, ensure that your GSTIN is active and valid. To verify your registration details or stay updated with the latest compliance changes, you can use the Official GST Portal.
In real accounting work, incorrect company GST details often lead to mismatches in GST returns. Selecting the wrong state or registration type can cause IGST to apply instead of CGST and SGST. It is always recommended to verify GSTIN, state, and registration type carefully before recording any transaction.
Step 3: Create Ledgers and Stock Masters
Create GST-Enabled Ledgers
📍 Sales Ledger
- Gateway of Tally → Create Ledger
- Under: Sales Accounts
- Set Is GST Applicable to Applicable
- Save
📍 Purchase Ledger
- Same as sales, but under Purchases Accounts
📍 GST Tax Ledgers
Create separate ledgers for CGST, SGST, IGST under Duties & Taxes.
When creating tax ledgers, the correct selection of Duty Type and Tax Type is the very foundation of automatic GST calculation. To ensure your ledgers are created without any errors, you can follow this professional guide: How to Create SGST & CGST Ledger in Tally Prime.
Example:
CGST @ 9%
SGST @ 9%
IGST @ 18%
Based on experience, most GST calculation issues arise due to incorrect ledger configuration. Many users create sales or purchase ledgers without enabling GST applicability. If the ledger is not marked as GST applicable, Tally Prime will treat the transaction as non-taxable, even if GST rates are defined in stock items.
Step 4: Assign GST Rates to Items
Tally calculates GST based on the GST Rate & HSN/SAC associated with stock items or services.
Method A: Item-Level Setup
- Gateway of Tally → Inventory → Stock Item
- Select the item → Enable Set/Alter GST Details
- Set Taxability → Taxable
- Select HSN/SAC & GST Rate (e.g., 18%)
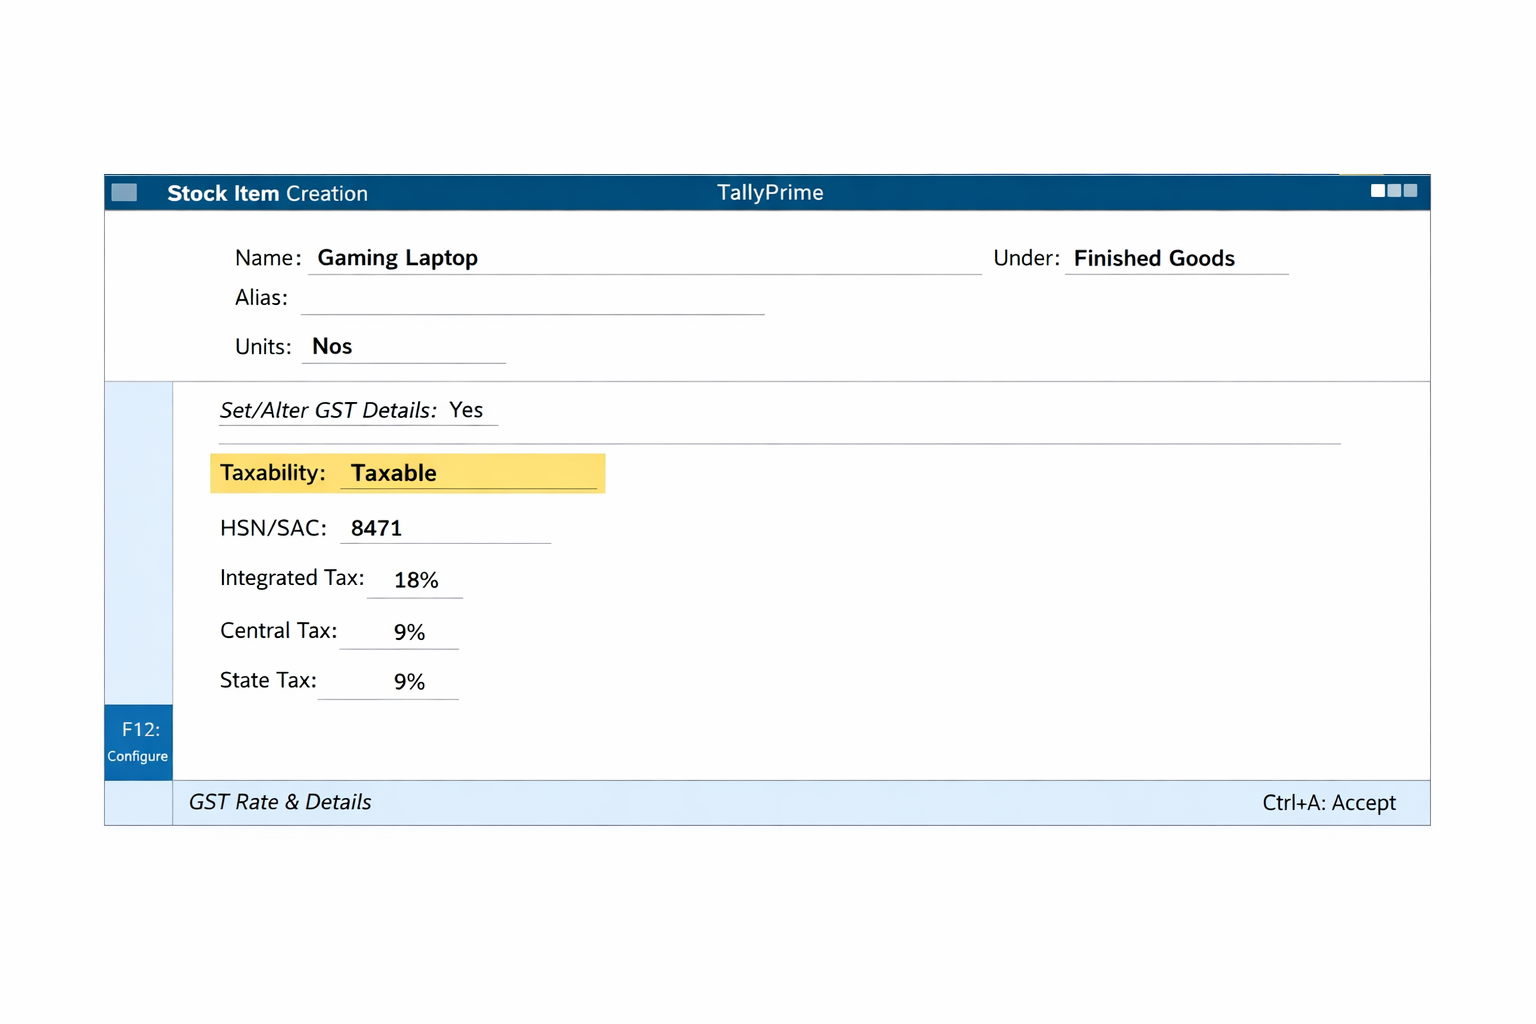
In day-to-day usage, missing or incorrect HSN or SAC codes are a major reason for GST not calculating. Even if GST is enabled globally, Tally Prime depends on item-level tax details. Assigning correct HSN codes and GST rates ensures that tax is applied automatically without manual intervention.
Method B: Use GST Classification (Recommended)
You can create GST Classification Masters and assign them to multiple items. This allows you to update the rate centrally — ideal if GST rates change (e.g., 5 %, 18 %, new slabs introduced).
If you are handling complicated transactions or managing multiple tax rates, the technical documentation available on the Tally Solutions GST Guide can be incredibly helpful for advanced troubleshooting.
Updated GST Rates in Tally Prime (2026)
After GST Council changes (e.g., Sept’25), Tally Prime’s GST Rate Setup report lets you update rates in bulk:
- Press Alt + G → GST Rate Setup
- Choose Stock Items or Ledgers
- Use Alt + S to update new GST rates (like 5 %, 18 %, 40 % slabs).
This eliminates manual edits across every master.
Many businesses forget to update existing stock items after GST rate changes announced by the GST Council. From practical experience, using the GST Rate Setup report saves time and avoids mistakes, especially when dealing with multiple items or frequent rate revisions.
Real Example: Automatic GST Calculation
Scenario: You sell goods worth ₹10,000 with 18% GST.
| Item Value | GST % | CGST | SGST | Total |
|---|---|---|---|---|
| ₹10,000 | 18% | ₹900 | ₹900 | ₹11,800 |
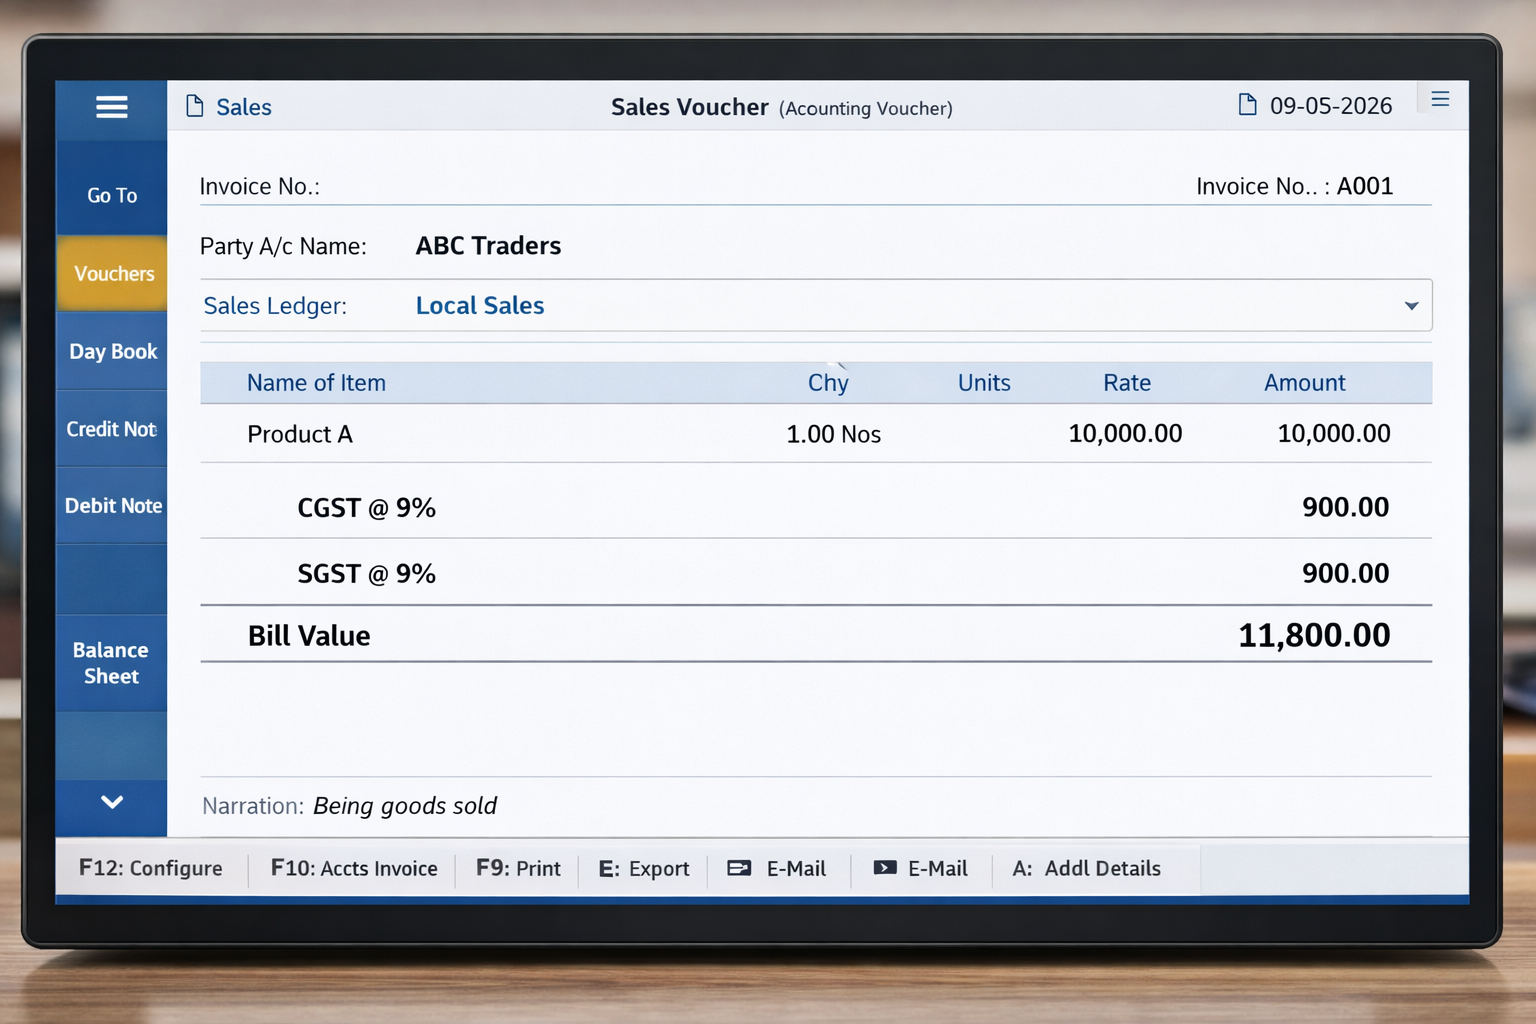
In real business scenarios, automatic GST calculation not only saves time but also reduces calculation errors. When masters are correctly configured, Tally Prime applies tax instantly during invoice entry, making it easier to maintain accuracy even during high-volume billing.
Formula:
GST Amount = Item Value × GST %
Total Amount = Item Value + GST Amount
Tally will calculate this automatically when you enter the item and quantity, as long as the GST details are configured correctly.
Common Mistakes That Stop Automatic GST Calculation in Tally Prime
- GST is set as “Not Applicable” in Sales or Purchase Ledger
- HSN or SAC code is missing in Stock Item
- Wrong taxability selected (Exempt instead of Taxable)
- GST rates updated but old stock items not modified
- Interstate sale recorded with intrastate ledger
Most calculation errors occur due to incorrect HSN codes. To ensure your automatic GST computation remains 100% accurate, always verify the correct codes using the CBIC HSN Code Finder.
Best Practices
Based on real accounting experience, most GST reporting errors in Tally Prime come from incorrect master configuration rather than voucher entry mistakes.
✔ Define HSN/SAC codes accurately for all items.
✔ Use GST Classifications for groups of items to reduce repetitive work.
✔ Update rates via GST Rate Setup report when GST slabs change.
✔ Always save masters before recording transactions.
Frequently Asked Questions (FAQ)
Q1: Can Tally Prime auto-apply GST rates ?
Yes, Tally Prime calculates GST automatically, but only when all GST-related masters are configured correctly. This includes GST-enabled ledgers, correct HSN or SAC codes, and proper tax rates.
Q2: What if GST rates change mid-year ?
You can easily handle this using the GST Rate Setup tool. Simply apply the new rate with a specific “Applicable From” date. This “Effective Date” logic ensures your historical books remain accurate while staying 100% compliant with 2026 regulations.
Q3: Does Tally Prime support multiple GST registrations in a single company file ?
Yes, absolutely. Tally Prime allows you to manage multiple GSTINs within the same company using Registration Profiles. This makes GSTR-1 and GSTR-3B filing significantly faster across your entire business.
Disclaimer
This blog provides general guidance on using Tally Prime for GST automation as of 2026. It does not constitute professional tax advice. Always consult a qualified Chartered Accountant or GST practitioner for personalized advice and the latest compliance requirements.
About the Author:
This article is written by an accounting professional with practical experience in Tally Prime and GST compliance for Indian businesses.
For those who are still using Tally ERP 9 and are planning to shift to Prime, you can better understand the core differences between the two versions by checking out my detailed tutorial on How to Create GST Ledger in Tally ERP 9.
Conclusion
Automatic GST calculation in Tally Prime significantly reduces manual work and boosts accuracy in invoicing and compliance. By enabling GST, setting up masters correctly, using GST classifications, and updating rates effectively, beginners and professionals alike can streamline their accounting workflows effortlessly.
This guide is regularly updated as per GST rules and Tally Prime changes to ensure accuracy and practical relevance.

